Monthly Archives: April 2012

Pesto, Chicken, and Portabella Pasta

Standard

Spaghetti is a great, quick, and easy meal. I cannot count the number of times there has been no real dinner plan and we just throw a pot of water on the stove top to make some pasta. Easy solution.

This is a simple recipe as long as you follow the directions on your pasta packaging. From there, you just add and stir for the most part. I have an original, homemade pesto sauce, but I will update on that later. Tonight we were out of some of the ingredients so I just used some store-bought pesto (still yummy). Exclude the chicken from this dish for a vegetarian meal. This is such a delicious dinner no matter which ingredients you include. Tinkyada never fails to impress and the noodles taste so amazing with the chicken and mushrooms. The pesto adds great flavor, though I don’t prefer a ton. This was a great success.

This recipe gave me the idea to try pesto chicken in the future, and I hope to try it soon.

Ingredients:

  • 1 package pasta/spaghetti (I use Tinkyada with great results every time!)
  • Water (depending to pasta cooking directions)
  • 1 package baby portabellas, sliced
  • 1-2 tbsp pesto sauce (approx)
  • Precooked chicken breast strips

Instructions:

  • Cook pasta according to package directions.
  • Meanwhile, cook mushrooms (saute or boil).
  • Heat pesto for a few seconds, add to pasta, and stir until it is evenly distributed.
  • Add in chicken and mushrooms and continue mixing until everything is even and dispersed throughout noodles.
  • Serve immediately.

Gluten-free and vegan veggie chips

Standard

120 calories per serving, no saturated or trans fat, 0 cholesterol, only 3% sodium, more than half of the carbs are fiber, 4 grams protein. These are the real deal all-natural snacks veggie chips.

You know you are about to indulge in a guilt-free, delicious snack when the first ingredient listed is green peas. Do not let this fact deter you, for these all-natural, gluten-free, vegan veggie chips are truly amazing. They are my new favorite snack. As shown in the picture, these chips are so much healthier than regular potato chips, or other veggie chips. The only fat in these chips is the “good kind” of fat. As an added plus, each bag is one and a half servings of vegetables! That was what shocked me most. These veggie chips are light and crisp, a very satisfying snack or lunch accompaniment.

These gluten-free veggie chips are crunchy and satisfying. They are filling for a chip snack and a food I would recommend any day. You can eat so many for just a small amount of calories. So go indulge in some of these delicious chips, you won’t regret it!

Corn Muffins with Pamela

Standard

This morning, I was looking through the recipes I wanted to make (for breakfast), trying decide what to cook next. If you have looked at my recipe index, you will know that I already have many recipes, so when my eyes alighted on corn muffins, I knew that would be what I wanted to make. I already had a recipe draft, so I pulled it out, made a change here and there, and went to work in the kitchen. I decided to make a slightly bigger recipe than what I usually make, because I have had such luck with Pamela’s products in the past. I just hoped I would be able to say the same for the cornmeal.

Everything was easy to mix to spoon into the muffin tin. Mine only took 15 minutes to cook, but I could see someone wanting a slightly darker muffin, so you could add up to 5 extra minutes in the oven. I am not a huge sweet fan, so feel free to add a little more sugar if desired. I knew I should have some, but I didn’t want so much that it would be a prevailing flavor.

These were so good! I loved them. The recipe makes 12 corn muffins, so there were plenty of leftovers. The corn muffins were so soft and steamy; they were not overly dense or crumbly, but I wouldn’t describe them as having a cake-like texture either. They were perfect, in my opinion. I don’t think there is anything I would change in this recipe. My mom asked me as the muffins were cooking if I had put cheese in them, which made me think I could try adding cheese to some of them next time I make them. Cheesy corn muffins…that sounds delicious to me!

Ingredients:

  • 1 1/3 cups Pamela’s baking and pancake mix
  • 1 cup medium cornmeal
  • 1/2 teaspoon salt
  • 1/2-1 tsp sugar
  • 2 eggs, beaten
  • 1 cup milk
  • 1/2 stick (1/4 cup) butter, melted/cooled

Instructions:

  • Pre-heat oven to 375 degrees and grease a 12-cup muffin tin.
  • Blend all dry ingredients together, then lightly and separately mix all the wet ingredients together.
  • Stir wet ingredients into dry and mix until completely blended and no flour or cornmeal clumps remain.
  • Fill muffin cups about 3/4 full.
  • Bake for 15-20 minutes.
  • Serve immediately or warm.

*NOTE 1: For corn muffins from scratch, you can replace Pamela’s mix with: 2/3 cup rice flour, 1/3 cup cornstarch, 1 tbsp baking powder OR 1 cup rice flour, 1 tbsp baking powder.

*NOTE 2: I am sure this recipe can be used to make cornbread as well. Here are just some general directions: Follow the directions above up until you pour the batter into the muffin tin. Instead, pour it into a greased 8-inch pan (this is the size that I have used for past recipes and it worked well) – and bake for about 25 minutes (maybe a little longer, since cornbread tends to take longer than the muffins).

UPDATE: These make great leftovers. I just finished the last of them, five days after I made them, and they have tasted great (if not better) each time I’ve eaten one. I had one with some soup one night which tasted especially delicious.

Brazilian Cheese Rolls

Standard

The pizza was amazing, and now it is the rolls’ turn to impress me. A while back I made an amazing cheese pizza crust (<–original post), literally cheese crust, that I found on Gluten Free Gobsmacked. The original recipe was actually meant for Brazilian cheese rolls, or Pao de Quejo, which this post is about. I have been so excited and impatient to try it out, and I was finally able to make them tonight for dinner.


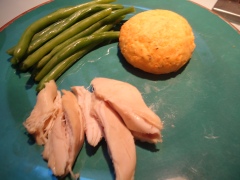
We had chicken, green beans, and these delicious cheese rolls. I have cooked for my family before, but this is the first time it has been an official meal item. Most of the time, my family only has small portions or a tasting, and I have lots of left overs that last through the week. But this time I made them for dinner. I was excited. It made my cooking official. Real. Big. I knew they like most of what I make, but this time it was different. Their opinion of the cheese bread was more important. So I crossed my fingers as dinner was served.

Everyone LOVED them (minus my little brother who will basically only eat chicken nuggets and cheese sandwiches). I got extremely satisfying reactions, many “Mmm”s and “Oh my God!” I think this recipe is definitely a keeper. It made 7 rolls, but I made some pretty big without realizing how much they would puff, so you could probably get 8 out of the batter. With four of us eating, we had a couple left over, so I am already looking forward to tomorrow! These cheese rolls are beyond delicious. They have a slightly crunchy outside and are soft, chewy, and delectable inside. They are extremely cheesy, so much so that at first, when I began making them, I was a little skeptical, but after taking my first bite, any previous doubts vanished from my mind. They are perfect. The only change I made was to use basil instead of dill and chives. Perfect. Delicious.

I know my cheese crust pizza post has this recipe on it, but I’m reposting the recipe because these are rolls, not pizza, and I didn’t include the pizza part in this post.

Ingredients:

  • 1+1/4 cups tapioca flour
  • 2 cups shredded cheese
  • 1 teaspoon baking powder
  • 2 eggs
  • 1/2 stick (1/4 cup) melted butter
  • 2 tsp dill
  • 2 tsp dried chives (I used 1/2 tbsp basil leaves in place of dill and chives)

Instructions:

  • Preheat your oven to 450 degrees.
  • Mix together all ingredients in your mixer well (I  used a hand mixer–just make sure all ingredients are totally combined).
  • Form into balls (about 1 1/2 inches or 2 inches) and flatten slightly (makes 6-8).
  • Place on tin foil on a baking sheet.
  • Bake for 8 – 10 minutes or until golden brown.
  • Serve warm.

Note: Sorry the last photo is so dark…and not very good. I only included it because I thought it gave a nice idea of how big the rolls are.

Taste Unlimited: Shop Review

Standard

Today I remembered a great little shop I used to love (still love), Taste Unlimited. This shop is located by Virginia Beach, and it is always the place my family goes when we go down to the beach….. I loved it before and after I became gluten-free. In my gluten days, I would get the most amazing turkey, mozzarella cheese, and lettuce sandwich. It is the best mozzarella cheese I have ever tasted, the turkey is so succulent and perfect, and the lettuce is noticeably fresh. There are so many options to cheese from, both with bread and fillings.

When we went to VA beach for the first time since I discovered my celiac disease, I was so disappointed and upset that I would no longer be able to enjoy one of my favorite food shops. When we drove to Taste Unlimited after spending the first half of the day at the beach, I hung back as everyone ordered over the counter. I gave my mom a look and she asked the employee if the shop had any gluten-free options by any chance. I was hopeful, but his simple apology confirmed what I had expected moments before. However, he thought a moment and asked me what kind of sandwich I liked. I told him and he told us to wait a moment. He promptly set to work making a sandwich for me, but instead of bread, he skillfully wrapped the turkey and cheese in huge lettuce leaves and handed me the wrap, smiling. I was stunned at his kindness, and thanked him, smiling myself.

Taste Unlimited’s service is great, friendly, and fast. It is not overly expensive and easy to spot due to the bright store colors, yellow and white. Along with over-the-counter food service, the majority of the shop is actually a shop, with refrigerated sections filled with drinks, shelves stocked with chips, snacks, and other foods, and gift items.

This shop inspired me to make my own lettuce wraps ever since, because they are just so delicious. And although I can make a pretty yummy replica, it doesn’t beat the original spur-of-the-moment lettuce wrap.

Top photo from Taste Unlimited’s website.

Apple Almond Salad

Standard

Salads are a healthy and delicious way to end the day. There are so many variations, and you can make it a meal or snack. It is so easy to experiment with salads and create recipes. Salad recipes are also quite lenient, and you can add and withdraw anything you desire.

This recipe is one of my more frequent salads. I love nuts, especially almonds, just as a quick snack, but they are also so delicious in salads. The apples add great flavor, a nice sweet side, to the salad. I realize the amounts are pretty vague, but I figured with a salad recipe, you don’t need to get too specific. This is just a general idea, but you can use however much of each thing you want. I honestly don’t have anything to add to that, other than this is a fantastic salad!

The last thing I will add is look out for a bunch of new recipes coming soon…I plan on getting busy in the kitchen this weekend! I am especially excited to try either Brazilian cheese rolls, popovers, or pesto pasta/chicken. So keep a look out for some tasty recipes.

Ingredients:

  • Enough fresh lettuce to fill a large salad bowl (or 1 bagged salad)
  • 1/2-1 apple, cut into small pieces
  • 1/4 cup almonds (or large handful)
  • A handful of pine nuts
  • A small handful of grapes, cut  in half
  • 1-2 tbsp goat cheese (and/or parmesan)
  • 1-2 pieces of GF bread’s worth of homemade croutons

Instructions:

  • Put lettuce in a large bowl, add nuts and apples slices, and mix until evenly distributed. Sprinkle goat cheese over top along with any desired GF dressing and add croutons.
  • Enjoy!

Quick Pancakes and Eggs

Standard

Lazy Pancakes

Today I was exhausted and did not feel like cooking or making anything. In my state of tiredness I decided to make some quick pancakes, or “Lazy Pancakes,” as I thought of them. The only ingredients I used were Pamela’s Pancake and Baking Mix and milk. So lazy.

This quick pancake “recipe” is a tablespoon for tablespoon ratio (I just tried these out in small amounts, as a quick snack). The first time, I used water, and the pancake actually tasted great. The second try, I used milk to see if there was any noticeable difference. There wasn’t much, but maybe the milk was a little better.

Now, the first lazy step for quick, lazy pancakes: measure out 2 tbsp of mix and milk and combine until smooth/no clumps remain. Step two: Microwave for 1 minute. Step Three: Serve immediately and enjoy. How easy was that? This is a great quick thing to make in the mornings to have with a scrambled egg, fruit, or whatever you enjoy in the mornings. It’s a delicious mini side. Having said that, I want to try using 1/2 a cup or maybe even an entire cup (a larger amount than 1 or 2 tbsp) to see if this could become a quick pancake replacement recipe if I need it.

Anyway, enjoy this recipe’s simplicity and deliciousness!

UPDATE: I have just realized that quick pancakes can become quick biscuits (possibly) by adding a bit of melted butter! Because, after all, the only ingredients in Pamela’s biscuits are the mix, milk, and butter. I will try this in the morning!

Quick Eggs

Quick pancakes, now quick eggs. Like I have said, sometimes you are running behind and just need a quick solution. Do you not have the time to go through the whole process of making a scrambled egg, plus washing all the cookware involved? Well, I have a simple solution that I use all the time.

Grab a coffee mug (or any microwavable cup/bowl), an egg (or 2), some milk, and salt. Mix the egg, milk, and salt in the cup, then put in the microwave and heat for about 30-45 seconds. Let cool for a minute and serve. You can also add things to the egg just like you would an omelette or regular scrambled egg. I like to just add lots of cheese to mine.

Simply Cucumbers!

Standard

I’ve mentioned before how one of my favorite snacks are a few cucumbers with some sea salt. Well here is a post and some pics dedicated to them. This is something that can be done in seconds, and something you can pig out on without having that guilty I-just-ate-so-much feeling. This is most likely the simplest recipe you will find on my blog. Do not pass it up just because it is green and healthy. Cucumbers are actually so delicious!

Your only ingredients: A cucumber and some sea salt.

Your only instructions: Slice cucumbers, sprinkle a tiny pinch of salt over each cucumber, and enjoy!

Delicious. Do-able. DONE.

(The salt in the picture above is regular table salt…I was out of sea salt when I had these, and I have to say the sea salt makes a difference. I highly recommend you use it if you can.)

Grilled Cheese Bites

Standard

Today I was sitting on my bed, doing nothing, when a recipe idea hit me: grilled cheese bites. I know I probably say this nearly every other recipe, but this time I mean it when I say, grilled cheeses are actually one of my absolute favorite foods. If someone told me out of the blue that I would be forced to eat grilled cheeses for lunch or dinner every day, I doubt I would be disappointed. I can’t explain my love of grilled cheeses. Is it their simplicity? Their cheesiness? The satisfying, buttery crunch of toasted bread with cheese? I don’t know, but I love everything about this delicious food.

So why not make a recipe for them? What if this tasty meal could become a snack item? An appetizer? So I decided to try something out. All you will need is: 2 pieces of GF bread (I prefer Udis), sliced/block cheese, butter (to taste/preference). Just as if you were making a regular grilled cheese. Now, there are two options to cook these.

#1: Simply make a grilled cheese and cut it into 2×2 or 3×3 squares once finished (you can also cut first and cook second).

#2: Add cheese to bread and cut into 4 or 9 pieces (2×2 or 3×3). Butter and cook in a) a grilled cheese maker or b) a panini maker (I like to do this one).

Voila! I guess these aren’t exactly snacks, but they would make a delicious appetizer if you shared them, because otherwise you’re still eating a whole grilled cheese. But you can always use as much bread/cheese as you want and you could make a large platter of grilled cheese bites for any occasion. Anyway, these were a delicious success!

Lastly, I combined these with my previous post/recipe – homemade tortilla chips– and cut up some cucumbers (already eaten). Today was a great lunch, I’d have to say!

Quick and Easy Tortilla Chip Snack

Standard

Sometimes you just need a break, a quick bite to eat that takes little or no time to make. Maybe even something that is only a couple of ingredients. This was my thought when I had the idea of homemade tortilla chips a few weeks back. I got the idea when I attempted to make tortilla croutons (because I had been out of my GF bread). Now I have taken that idea and made it a reality. A delicious, wonderful reality. These worked so well and they were one of the easiest recipes I have made so far. You could easily make these again and again with no sweat. Of course, you could also always use as many tortillas as you want or need to make LOTS of tortilla chips! This recipe is just for a couple servings. Just two or so people having a quick bite to eat. But it can be so much more than that.

Ingredients:

  • 2 GF tortillas (I use La Tortilla Factory, which are BIG tortillas)
  • Olive oil
  • Salt (to taste, not too much)

Instructions:

  • Preheat oven to 375 degrees.
  • Brush both sides of tortillas with olive oil.
  • Stack and cut them into 8 sections (16 chips) and sprinkle with a small amount of salt
  • Lay each chip out on aluminum foil
  • Bake 8 minutes, then turn them all over (with tongs)
  • Bake an additional 2 minutes
  • Let them cool a little and serve!

UPDATE: I just used my leftover chips to try and make nachos and they turned out great! Just sprinkle your choice of shredded cheese and heat in microwave for about 20 seconds. They were so delicious!