Category Archives: Recipes

Broccoli Parmesan Fritters

Standard

Last night my mom and I discovered a new recipe through Pinterest, a great way to discover new things…especially food! There are tons of gluten free recipes, including broccoli-parmesan fritters, my new favorite food. These things were amazing! I have never tasted anything like them and they were simply out-of-this-world delicious! These fritters, by Smitten Kitchen, are so easy and simple to make. Quick and rewarding, I wish I could make these every day. I already love broccoli, and my family has made a recipe in the past involving broccoli and cheese (which I really should post because it is delicious!), so I had high expectations for this recipe.

I cut the broccoli as dictated and let my mom steam it. Meanwhile, I mixed the other ingredients while the greens cooked. My favorite part, honestly? Mashing everything together before frying. Now, for this, we were not entirely sure how much oil to use. Some people have a layer of oil covering the pan, but if have not already noticed, I like to keep things healthier if and whenever possible. So we just had a little oil, which mostly gathered at the edges of the pan we were using, but also left a thin film in the center.

So finally, we compressed and patted our…dough? Mixture? Whatever you want to call it, into little patties. We got 7 good-sized fritters out of this recipe, each being about 3-4 inches or so in diameter, and about 1/2-1 inch thick. Once all the fritters were finished, and a beautiful golden-brown, I could hardly wait to try them. But first we lined the fritters up on a paper towel-lined plate and let them cool for just a minute. Finally I just couldn’t stand it. Abandoning any sort of utensils, I picked one up and took a tentative bite. I think I went to Heaven. It almost melted in my mouth (not actually). I didn’t want that first bite to end. I wanted to keep chewing. In short, the broccoli parmesan fritters were delicious, to say the least.

It was just my mom and I eating them, too, so we each got three (saving one for the next day) and then had some smoked salmon on the side. I was so full by the end of dinner. My mom ate her salmon with sour cream, and I had some cottage cheese on the side instead. We both agreed that this would definitely become a more common meal (which means I will hopefully have some pictures up soon), so I am simply dying to devour these once more!

Get the recipe for these delicious broccoli parmesan fritters now at Smitten Kitchen!

ALSO: Why just broccoli and parmesan? There are so many fritter options! I really want to experiment some with these delicious treats…potatoes, cauliflower, squash, zucchini…who knows what else!

Baked Potato Fries

Standard

French fries have always been a weakness of mine. I will say that I hate fast food, including their fries. I doubt fast food is even gluten free, because of all the cross-contamination, but that doesn’t even matter since I prefer to avoid it at all costs. When I did eat it, it always gave me the worst stomach ache afterwards. Anyway, I do love french fries if they have been done well. I will not spurn restaurant french fries (unless they contain gluten, of course, and even then it’s tough) or the frozen kind that you can get at the grocery store. But my favorite style/type of french fries are definitely the homemade ones. They are better for you because there is not nearly as much oil/grease involved (at least the way I do it) and they taste SO much better!

For these delicious gluten free and homemade french fries, all you need are potatoes, olive oil, and a little salt. You use 1 large potato per person. Now, you can cut the potatoes lengthwise, for traditional-style fries, or you can can slice them, to make round fries like I like to do. These are great because they are so easy and make a delicious lunch and/or dinner side, but they also make amazing hash browns for breakfast or brunch. The french fries are also great for a snack, if eaten in smaller portions. Mm-mm.

However, this post is not exactly about fries. Sort of, almost, but not quite. Because, in addition to the methods above, you can also bake your potato the way I did tonight. The way that this post is mainly about. The way that is actually the easiest and simplest of the three methods. The title of this post is “Baked Potato Fries.” And that is more literal than you’d think, because with this delicious side, you don’t cut all the way to make totally separate fries. You slice the potato into thin pieces, like you would normally, but stop short before cutting all the way through.

Potatoes, no matter how you cook them, are always great meal accompaniments. Tonight, we had one of my favorite things: salmon. Baked salmon, veggies, and the baked potato fries. For the veggies, we sautéed mushrooms, squash, and green beans with a little bacon (similar to my veggie dinner). SO. GOOD. Now for the potato recipe…

Baked Potato Fries

Preheat the oven to 350 degrees. Slice each potato into thin pieces, like you would normally, but stop short before cutting all the way through, so the potato is still combined, but sliced. See the picture above and below for a better reference. Next, put the potatoes into a glass or ceramic oven-safe dish and lightly drizzle olive oil over each potato, so that it goes between the slices and on the top/sides. Lastly, sprinkle a tiny bit of sea salt over each potato. Put the casserole dish in the oven and bake for 30 minutes. Take the dish out and use a spoon to reapply the leaked oil and juices. Put dish back in oven and bake an additional 40 minutes. Serve almost immediately (will be hot).

Baked Fries

Preheat oven to 350 degrees and line a baking sheet or pan with tin foil (grease lightly). Slice/cut potatoes to desired style and size. Line the pan with a single layer of your potatoes. Bake potatoes in the oven for about 30 minutes, or until golden. Let cool a little before serving, because they will be HOT, but don’t wait too long because they also cool fast.

Skillet Fries

You can also cook your fries on the stove top. Just lightly grease a pan with olive oil and preheat pan to medium high heat. Then, just add as many potatoes that will fit in a single layer ont the pan. Let them cook for about 2 minutes and then flip them all over. They should be a golden brown color. Once finished, remove fries to a paper towel-lined plate to get rid of any excess oil. Let the fries cool a little before serving, because they will be HOT!

NOTE: I actually made these yesterday morning, for my frittata. I also have to admit that not all the fries, or hash browns, made it into the frittata, although they all made it to my stomach!

Fabulous First Frittata Attempt

Standard

Today I was planning on making more mini quiche/omelets, but with different ingredients. However, I made a spur-of-the-moment decision to bag that and try to make a frittata instead. I have seen all sorts of frittatas online and have been dying to try one. I really love the ones that use broccoli and/or spinach, but unfortunately, I had neither. One wonderful ingredient I did have, however, was potatoes (note: I really want to try to make a Spanish tortilla sometime). Potatoes, mushrooms, and turkey bacon. I usually only use chicken or turkey as my meats, because they are healthier and, in my opinion, better–tastier. I don’t even really like meats like bacon, but I will occasionally make an exception, like here. Notice that I used turkey bacon, so even though it is not great, it is better than regular bacon.

This was not a perfect, traditional frittata. In other words, I do not own a cast iron skillet (I should…) so I left out the bake-in-the-oven step. Nonetheless, this recipe turned out fabulous! It was so delicious and I can’t wait to make more and experiment with different ingredients. The texture was perfect: not mushy or slimy or anything like that. Everything was cooked to perfection!

For a vegetarian frittata, omit the bacon and use more of the other ingredients, or add your own.

Lastly, because I only used 3 eggs, this frittata was a little thinner than most…almost like a pizza frittata (Hmmm…)! But you can always add more eggs and ingredients, although I can’t say how the cooking time/method would change. Enjoy!

Ingredients

  • 3 eggs
  • 1 tbsp milk, approx (I don’t even measure)
  • 2 bacon strips
  • Cheese
  • Potatoes (I used a quarter of a large potato)
  • Portabella Mushrooms, cut up (1-3 handfuls)

Instructions

  • Preheat a medium frying pan with a little olive oil over medium high heat.
  • Slice potatoes (about 1/8-1/4 inch) and cook in pan until golden-brown (careful when flipping–oil is very hot).
  • While the potatoes are cooking, whisk eggs, milk, and a handful of cheese together well until smooth (I used a fork to mix) and cut/tear bacon into small pieces.
  • Once potatoes are done, remove them from the pan onto a paper towel (or two) to absorb any excess oil.
  • Then pour most (not all) of the remaining oil in the pan into the sink and cook mushrooms over a lowered temperature (they will still cook very fast; do NOT leave them). Once the mushrooms are done, remove them to a plate or paper towel.
  • Move pan to a new, cool burner and wait a minute for the pan to cool some.
  • Spread all of the bacon bits, mushrooms, and potatoes in an even, single layer on the bottom of the pan, and then pour the egg mixture on top. Sprinkle a little more cheese around on top.
  • Turn the heat to medium low and cook for about 10 minutes. After a while, when the egg begins to set on the edges, use a spatula to separate the frittata from the edge of the pan and tilt it so that the uncooked egg goes to the bottom.
  • The frittata will be finished when the egg is almost entirely set, and there is just a tiny bit of uncooked egg. But even that should not really move around if you tilt the pan. At this point, the frittata should easily come off/out of the pan. Gently and carefully slide your spatula underneath and slide the frittata off of the pan and onto a plate.
  • I like to cut mine into quarters (using the spatula). Serve immediately.

Omelets at the Beach

Standard

There is nothing better than a delicious breakfast that is also healthy AND filling. I often hear people say eat an egg to fill you up. I believe this is true, but for me, one egg on its own is not always enough. Adding some fillings and making that egg into an omelette is a different story. I have had one other omelette post, and this one is very different and uses a wider variety of foods. I tried to make a more sophisticated omelette, if you will. Some of the ingredients I used are not some of my favorite foods, but in an omelette, mixed with lots of other things, everything is absolutely delicious.

This was a perfect recipe for the beach, because it was quick, easy, and everyone LOVED it. I made this amazing meal almost every morning I was at the beach, in part because it was truly so filling and kept me going all day, so I didn’t have to walk back up to the house for a big lunch. I was fine with bringing down a little snack to munch on in the late afternoon (like almonds, fruit, one of my snack/trail mixes). Unfortunately, I have no beachor omelette photos right now, because I seem to have…ahem…misplaced my camera amongst my many bags and beach things. So, I will try to make another omelette as soon as I have more eggs, because, of course, I am also out of eggs. No camera. No eggs. Sigh.

Anyway…the only tricky step with this recipe is the timing. The fillings all are different and take different times to cook. Spinach, for instance, takes almost no time at all to cook, so you add it to the pan last. Onions and mushrooms take about the same time to cook and the longest, so I add them first.

I do not give a whole lot of specific amounts for the fillings, because they really depend on the personal preference of the cook. I use equal amounts of everything, approximately. I also love a lot of fillings with this particular omelette, so I use a lot of ingredients. One thing to keep in mind: spinach makes less than you think once it is cooked. Also, you can use any type of onion, I just really love the taste of red onions specifically.

Ingredients:

  • 1 red onion
  • 2-3 mini portabella mushrooms
  • 1/2-1 cup spinach
  • 2-3 eggs
  • Splash of milk
  • Pinch of salt
  • 1 tomato
  • 1 avocado

Instructions:

  • Dice the mushrooms and cut up the onion. The onion should come apart in thin rings, which you can then cut up.
  • Lightly grease a frying pan with olive oil and add the mushrooms and onions to the pan over medium low-medium heat.
  • Cook onions and mushrooms until they begin to sizzle are near being done, then add the spinach and cook everything until fully cooked (can also add tomatoes with spinach to cook slightly if desired).
  • Pour fillings into a bowl and cover to keep warm.
  • Next, whisk eggs together with a splash of milk and a pinch of salt and cook omelette style (for a healthier option, I sometimes use just one egg yolk and two or three egg whites).
  • Add fillings from bowl as well as the avocado and tomatoes (if you did not add them to the cooked veggies already) to the egg and serve immediately.

NOTE: You will not use all of the tomato, avocado, or onion unless you make more omelets/eggs. Just stick them in a ziplock bag and save for later.

Mini Quiche – Crustless or with a Crepe Crust

Standard

Mini quiche. Omelette muffins. Egg muffins. Quiche muffins. Whatever you want to call them…

I have wanted to make a quiche for a while, but I haven’t really known where to start or what kind of crust to use. So I decided to combine a quiche with another recipe I’ve been wanting to make, because, I realized, they are actually sort of the same thing. Quiche and omelette muffins. But isn’t an egg or omelette muffin just like a mini, crustless quiche? Of course.

So this morning, as  was getting all excited to make these, I realized I only had two eggs left. Oh well. I was very pleased when I discovered that 2 eggs actually makes exactly 3 mini quiches. I didn’t have any special toppings today: no peppers, mushrooms, onions, nothing. All I had to work with was cheese and some turkey bacon that need to be used up. I like to avoid unhealthy meats as much as possibly, including bacon, but I made the exception since this was turkey bacon and I had nothing else. These are so easy and quick to prepare, and also quick to cook. Mine only took 10 minutes, and so the whole time I spent preparing/making these was about 15, maybe 20 minutes total. These are great because you can use so many fillings, just like a normal quiche or omelette. What will you use?

Oh my goodness these crustless quiches were AMAZING. So delicious! I will definitely be making these again, hopefully soon, and hopefully with some new and different fillings. The egg set wonderfully and was not runny at all. The bacon was perfect and not tough, and the cheese…wow. The cheese was melty and complemented each quiche beautifully, deliciously, amazingly. These crustless mini quiches were just all-around perfect. I highly recommend making some.

Mini Crustless Quiche

Ingredients:

  • 2 eggs
  • 2 tbsp milk, approx
  • 1/3 cup cheese
  • 2 pieces turkey bacon, precooked
  • Any additional omelette/quiche toppings or seasonings desired (other meat, veggies, spices, etc)

Instructions:

  • Preheat oven to 350 degrees and grease 3 muffin cups
  • Whisk eggs and milk together well until smooth (I used a fork for this).
  • Cut/tear bacon into small pieces and divide bacon into two piles. Add 1/3 of the bacon from ONE pile to each cup.
  • Evenly add the egg mixture to each cup ( did a little at a time and got them perfectly matched). Just use your best judgement, and if one cup has a little more or less, do not worry.
  • Add about half the cheese your going to use into each cup and use a fork to slightly stir it into the quiche mixture. Add the other half of the cheese on top of each cup.
  • Bake “muffins” for 10-15 minutes or until egg has set.

Mini Crepe Quiche

For a crepe quiche, use the same recipe above, but use a crepe crust. All you need to do is make the crepes first (3 for the recipe above) and line each muffin cup with one crepe. You can use cornstarch or rice flour crepes, or the crepe recipe of your choosing. Then add the egg and other ingredients according to the crustless quiche recipe. You may want to check on these mini quiches a little more, to make sure the crepe is not overdone, but you should be fine. The crepe will be like a crust-a little crunchy but not too hard.

This crepe quiche recipe is inspired by a post over at Lexie’s Kitchen.

Delicious, Nutritious Breakfast

Standard

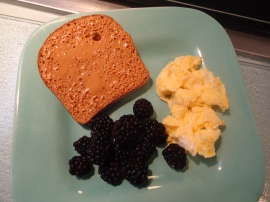
Breakfast is great, and a great time to try delicious recipes, but sometimes I like to keep it simple and yummy while not having to cook too much. I have recently enjoyed throwing a bunch of little things together for an awesome and healthy breakfast. In simplest terms: toast, eggs, fruit.

Before I get into specifics, I also need to share my latest discovery…and obsession. Almond Butter. Where do I begin? I love almond butter so much more than peanut butter. It is healthier and much more delicious, in my opinion. It is just as creamy, with only a slightly different texture that I enjoy better. It stores well and lasts long…all the same perks as peanut butter, but tastier. I now prefer an almond butter sandwich for lunch, as opposed to peanut butter. I have also recently loved making some almond butter toast – a piece of gluten free bread slathered with almond butter and lightly toasted. So. Amazing. It is creamy and melty and heaven in my mouth! Note the tiny bubbles–those are from being toasted. This has also really made me want to try making homemade almond butter (I always have almonds on hand, because I love those, too!)…something to think about.

Next, I make an egg. I either scramble it or make a quick egg, ready in the microwave in just about a minute. You can add extras, but like I said, I’m keeping things simple.

Lastly I pull out the berry containers. In my fridge, there is always some sort of combination of blackberries (my faves), rasberries, and blueberries. Along with my toast and egg, I will pour 1-2 handfuls of berries onto my plate. These are usually mostly blackberries, with a few of the others as well.

  • Almond butter toast
  • 1 quick or scrambled egg
  • A couple handfuls of berries (I love blueberries and blackberries)

I literally had this for breakfast three days in a row (before I made french toast and a fourth time today) – all of the food is incredible and makes a wonderfully delicious combination! This meal is high in protein and blah blah blah…I couldn’t tell you the specific nutritional information. But this is a great balanced and healthy breakfast to start your day off with!

A Dinner Modification: Last night I wasn’t very hungry or in the mood for anything heavy. I was looking for a light meal. Then I thought: my newest breakfast treats. I made the almond butter toast, an egg, and swapped the berries with some dinner greens and cottage cheese. Mm-mm-mm!

French Toast, sweet or savory

Standard

I don’t like sweets. So how can I enjoy french toast? Don’t make it sweet! When I was younger, my family made french toast ALL the time. For me and my younger brother, who don’t like sweets, however, we just had our french toast savory, with no sweetness added. It was just…eggy bread, I guess. But it is delicious nonetheless. The two huge breakfast treats in my household were pancakes and french toast. It has been quite some time since the last time I had this wonderful breakfast food, so I decided to make some this morning. French toast is great with fruit and is an awesome meal to keep you going through the day.

This recipe makes two pieces of french toast. In other words, one egg is equivalent to about two pieces of bread. I had 1 piece of french toast, and then was craving just a little more, so I made a half piece and scrambled the remaining egg. I had my french toast with some fresh blackberries. SO. Good. French toast is one of those breakfast foods that is so delicious but quick and easy as well. My entire breakfast took a total of about 10 minutes to make, if that, and that is including preparation and cooking time for both pieces of french toast. I am 100% satisfied.

When you grease your pan, you do NOT need a ton of butter. I probably only use about half a tablespoon, if that. Only use more if you love the flavor, but I honestly think french toast is already so delicious! Knowing when to flip the french toast is not tricky at all. Wait a couple minutes and then carefully lift up the edge to peek at the underside. It should be browning and make your mouth water. Check out the pictures below to see how mine turned it…it was PERFECT!


These beautiful pictures are due, in part, to Udis bread, I think. It soaked up the egg remarkably and cooks so well, browning perfectly. This, on top of its amazing taste, makes Udis a fabulous choice of bread. It is simply my favorite!

Please note, while I used milk in my egg mixture, I am sure that as long as you mix/whisk your egg(s) very well, this can be done without the milk or with water instead for some delicious dairy free french toast. Also, just use a dairy free substitute for the butter. Voila! Dairy free french toast.

Ingredients:

  • 1 egg
  • A splash of milk (optional)
  • 1-2 pieces gluten free bread (I use Udis)
  • Powdered Sugar
  • Syrup

Instructions:

  • Whisk an egg with a tiny splash of milk (no more than 1 tbsp) in a bowl.
  • Put one piece of bread into the egg mixture, gently pressing on the sides/edges to completely cover and soak. Turn the piece of bread over and do the same thing on the other side.
  • Leave the bread in the egg mixture to soak while you melt a little butter on a frying pan over high heat. 
  • Carefully transfer the bread onto the greased and heated frying pan to cook.
  • After about 3 minutes, turn the bread over and cook the other side for an additional 1-2 minutes. (After your first piece of french toast, feel free to re-butter the pan and cook some more. With any additional french toast, it won’t take more than 1 minute on either side.) 
  • Remove from pan and serve immediately.
  • For sweet french toast, cover both sides with some powdered sugar, top with syrup, and dig in. Otherwise, enjoy your savory french toast!

Get through those midmorning/midday cravings

Standard

Usually a good breakfast and lunch are enough to keep me going, and if I have a sudden craving, it passes within minutes. Sometimes, however, I have cravings in between meals that just won’t go away. When this happens, I try not to munch on unhealthy snack foods. I decided to compile a simple list of my go-to foods when I just want a snack. If I mention cheese, I usually refer to a couple bites of cottage cheese.

  • Gluten free Chex Mix
  • Some fruit, fresh or dried (with cheese)
    • apple/orange slices, any berries, grapes, clementine/tangerine, etc
  • Veggies with hummus, peanut/almond butter, cottage cheese, or plain!
    • celery, cucumbers, carrots, lettuce, pepper, etc
  • A small spoonful of peanut/almond butter
  • Various trail mixes (see below)
  • A few cheese or peanut/almond butter crackers (with fruit or veggies)
  • One hard-boiled egg
  • A little plain popcorn (or lightly salted)
  • A rice cake with peanut/almond butter
  • Yogurt-covered raisins

Below are also some quick homemade trail mix ideas (I have not tried them all myself). You can add or take away from any to reach your perfect snack mix. A general mix is a combination of: a grain (like Chex), nuts, seeds, dried fruit, popcorn, pretzels. My mixes include almonds, rice chex, smartfood/plain popcorn, Glutino pretzels. Then I love adding seeds, dried fruit, and other types of nuts whenever they are available. A last note: dried fruits include raisins, apple chips, banana chips, etc.

  • Rice chex, smart food, and almonds
  • Rice chex, pretzels, raisins, nuts
  • Popcorn, pretzels, nuts
  • Rice chex, raisins, almonds, dried apple chips
  • Sunflower seeds, nuts, popcorn, dried fruit
  • Sunflower seeds, almonds, dried fruit

For a touch of sweetness, you can also add some M ‘n Ms or chocolate chips. Just make sure they are gluten free, because candy like M ‘n Ms are often processed in the same facilities as wheat/gluten.

Not only are all these great go-to snacks in case of food cravings, but they are also awesome snacks in general. They are delicious things to munch on for people of ALL ages as well. Pack them for lunch, add them to a breakfast, or serve them as appetizers (depending on which one you choose, of course!).

If your cravings or rumblies continue, drink WATER. Fill up a water bottle or a large glass to the top and take a big sip whenever thoughts of food take over your mind. Just drink a lot. If the water trick does not work, take a walk or go for a jog. Exercise actually suppresses your appetite, and even just a 15-minute walk should do the trick. If exercise is not your thing, do something. Occupy your mind, your hands. Play with your kids, play an active Wii game, read a book your really in to, do some yard work, run those errands you’ve been putting off, whatever. Distract yourself. Finally, GUM. Gum is my savior. My sugar-free, no artifiacial flavor gum is one of the most wonderfully simple appetite suppressers out there. My favorite is Orbit spearmint, and it actually does work. Gum also helps me focus and concentrate on tasks at hand.

My last note is this: do not think too much about food, if you’re dieting or in general. If you are tempted to grab a snack, or if you are standing in front of your pantry tempted to eat something, just ask yourself a simple question. Am I hungry? Are you hungry? If not, walk away. If you are, get something healthy, like from the list above.

Fajita or Quesadilla on the Panini Maker

Standard

When I think quesadilla, I always imagine a cheese quesadilla, with the cheese oozing out and stretching when I bite into it. Because other than adding some chicken occasionally, the only quesadillas I eat are cheese. When I think of fajitas, I imagine stuffing the tortillas with as much cheese, vegetables, chicken, and other fillings as possible without breaking the tortilla or making it explode. In conclusion: I consider anything more than cheese, and maybe some chicken, in tortillas a fajita. They really are very similar. Let me add in here that you can make this completely vegetarian by omitting the chicken.

Last night I had fajitas for dinner, and for lunch today I made a delicious quesadilla, both on my family’s Panini maker. The great thing about a Panini maker is you can cook almost anything on it, and quickly too. It doesn’t alter the taste of whatever you are cooking, or if it does, not in a negative way. I have made quesadillas and fajitas, but I have also cooked grilled cheeses, sandwiches, steak, and am planning on experimenting with other types of foods and even batters on it.

For the tortilla, I always use La Tortilla Factory. I have looked for the Mission Corn Tortillas in the past, but none of my stores ever have them. I’m okay with that, however, because the La Tortilla Factory tortillas are so delicious. The only downside (if it’s even a bad thing) is they are HUGE. I mean, they are about 12 inches in diameter or so, so I usually only use them in halves. That is actually a positive thing, though, because each package only comes with 6 tortillas. Oh well, they are very yummy, and they don’t break or crumble. La Tortilla Factory tortillas are just like wheat tortillas, with none of the expected gluten free issues. You can roll them with no problems.

One thing I absolutely love about fajitas and quesadillas is they are SO easy and quick, even without a Panini maker. They are also great for getting rid of left overs.

Ingredients:

  • 1-2 tortillas, gluten free (I use La Tortilla Factory)
  • Cheese
  • Pepper/onion mix, sliced (I like to leave the onions out)
  • Chicken, precooked
  • Any additional veggies/fillings you desire
  • Olive oil (to brush on top of tortillas)
  • Sour cream, salsa, guacamole or other fajita toppings ( I actually use cottage cheese because it is healthier than sour cream an d, in my opinion, tastier)

Instructions:

  • Place a large frying pan on the stove top and dump in your veggies and chicken. Turn the temperature to about medium high. Once veggies and chicken begin to sizzle, stir them around until the fajita mixture is done.
  • Meanwhile, plug in your Panini maker or prepare another pan to cook your fajita.
  • Once fillings are finished cooking, put your desired amount (not too much or the tortillas might get soggy or break) on the tortilla. Fold the tortilla over and lightly cover the top with olive oil. Place fajita on the Panini maker and quickly brush a small amount of olive oil on the other side (If you are using two tortillas, put the fillings on one and cover with the other, and make sure to put a little olive oil on both sides).
  • Cook fajita for about 2 minutes.
  • Cut into slices, fold, or roll and ENJOY.

FOR QUESADILLA: Just cover one tortilla well with a single but generous layer of cheese, about an inch from the edges (don’t need more than that), and place second tortilla on top (or break one in half). Then cook the same way as the fajita on the Panini maker. If you do not have a Panini maker, you can also bake your quesadilla (which I actually like better if I have the time). That was my first original recipe, because it is so easy. You can find that post HERE.

Baked Mozzarella Sticks Using Rice Chex Bread Crumbs

Standard

Today I was deciding which recipe I should make next. I saw mozzarella sticks on my Recipe Index, and knew that would have to be it. I apologize, because that was probably one of the first recipes I have wanted to make, and it has been on my to-do list for far too long.

Quick back story: I decided to try these after making a favorite dish of mine, chicken parmesan, which uses my Rice Chex bread crumbs. After my discovery of these simple gluten free bread crumbs, I thought of all the recipes I could make gluten free. My mouth simply started watering when I thought of gluten free mozzarella sticks. I have only had mozzarella sticks one other time, and those were in Mexico before my gluten free days. In other words, I had a lot to live up to. I went about making these like I would the parmesan chicken, except I omitted the parmesan, of course. The only additional ingredient was the flour to ensure everything would stick better, because I didn’t want the cheese leaking all over the place! For the egg mixture, I just made that like I would a breakfast egg: 1 egg to 1 tbsp milk.

My excitement at making these delicious gluten free treats was temporarily short-lived when I discovered that I had no cheese sticks. However, I did have a giant block of mozzarella cheese staring me in the face. Why no? I cut some strips from the block and evened them out to the proper size. You can make however many of these you want, as long as you have room. The amount in the ingredients is half the amount of mozzarella sticks you will have. 16 was a good amount for me. I take that back…my family LOVED these way too much–I should have made more! Even though they weren’t perfect, they were delicious! And I think if I make these again, I will use my cut-cheese-sticks-from-a-block method, because that worked just fine and it’s cheaper.

Like I said, these were delicious! They turned out beautifully…sort of. Some of them did leak, but others were perfect. I sort of cheated and only left the precooked mozzarella sticks in the freezer for 20 minutes, and I don’t think that was long enough. The mozzarella sticks didn’t leak a ton, but that was partially due to me taking them out of the oven at only 5 minutes, so the rice chex bread crumbs didn’t brown as much as they could have. I do think that the 5 extra minutes would’ve been enough, but 30 might be the magic number. They were close…notice in the picture above how the top row is perfect, the middle row is pretty darn good, and the major leakage is in the bottom. I don’t know if this is coincidence, or if it has to do with the position in the freezer. And even though the rice chex bread crumbs weren’t as toasted as they could have been, they were definitely cooked and the cheese sticks were SO melty! I tried to get a photo of how much the cheese stretched, but none of them turned out.

I definitely hope to make these again! They are great little appetizers, but make sure to make a LOT because they will be gone in seconds!

Ingredients:

  • 8 pieces string cheese, mozzarella
  • 3-4 tbsp rice flour
  • 1 egg
  • 2 tbsp milk
  • 1/2-1 tsp dried basil
  • 1 1/2 cups Rice Chex, NOT crushed

Instructions:

  • Cut string cheese pieces in half (for 16 pieces).
  • Place flour in a small bowl and mix/whisk eggs and milk in a separate, small bowl.
  • Crush rice chex thoroughly for rice chex bread crumbs (as fine as you can make it) and combine with basil in a third bowl (I used a deep plate so it would be easier to roll the cheese sticks).
  • Lastly, cover a baking sheet with tin foil and lightly grease with oil or Pam.
  • Individually, roll each mozzarella stick in flour, dip in egg mixture, and carefully and completely roll in Rice Chex crumbs.
  • Carefully put each mozzarella stick on the greased baking sheet. Continue until all mozzarella sticks are prepared and on the pan.
  • Put tray in freezer (make sure it’s flat!) for about 25 minutes (do NOT skip this step)
  • Preheat oven to 400 degrees.
  • After about 25 minutes of freezer time, place pan in oven (no higher than middle rack) and cook for about 5-8 minutes.
  • Serve immediately.